News
Here are some beginner-friendly tips for playing chords on the guitar.
Table of contents
What is a guitar chord?
A chord happens when you play several individual notes together instead of plucking each one on its own. Some notes sound better with each other than others, and the combinations are named after the sounds that the notes produce together.
Thinking in shapes
A big part of guitar playing is thinking in shapes and building muscle memory. All the chords that exist are thought of as shapes on the fretboard, which helps with memorizing them. Even scales and melodies form shapes on the fretboard.
Pay attention to the shape each chord forms and how it feels to form that shape with your fingers. The point of this exercise is to build up a muscle memory for each chord shape, so that in the end you can play without looking down at your instrument–or even with your eyes closed! This also helps you to sing and play chords at the same time.
Tip: Make sure you’re playing with your fingertips. If your fingers are flat, the strings below will be muted or cause some other disturbance. Check each string as you play and practice forming the correct shapes for each chord.
How to read guitar chords
Let’s begin our journey into the world of guitar chords by looking at three basic beginner chords you should know. Below we have explained each chord and presented them in a guitar chord diagram.
In each diagram you’ll see the name of the chord on top as well as the names of the strings from left to right. In the diagram itself, you’ll see which strings to play and how to place your fingers on the guitar fretboard. Remember to check if there are strings that should not be played, like in our third example.
Guitar chord diagrams
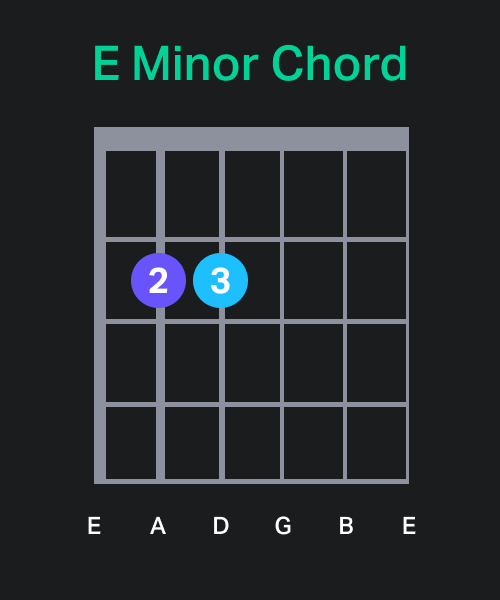
E minor chord
For this chord you’ll only need two fingers, middle and ring. Play the E minor chord by placing these two fingers on the 2nd fret of the E and D strings while allowing the other strings to ring out openly.

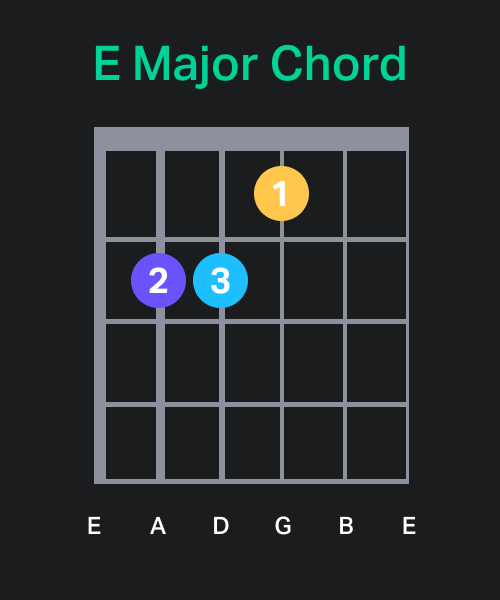
E major chord
The next shape is exactly the same plus an additional finger. Keep the minor shape, adding the index finger on the 1st fret of the G string.

Tip: Listen to the difference between major and minor. Go back and forth slowly a few times. You might notice that these two chords sound quite different and convey an entirely different mood.
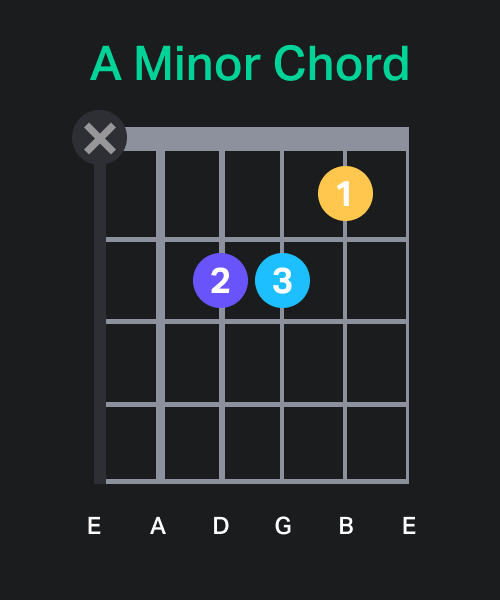
A minor chord
Take the E major shape and slide all fingers down one string. With Am, you only strum from the A string down, so the thickest E string is not played. Here lies the challenge of the A minor chord as opposed to the previous two: you’ll have to start the chord on the A string, rather than the low E string.

Transitions
Transitions, or how you move between chords, are super important. It’s all about being smooth and direct. If you take your fingers off completely, you’ll waste a lot of time.
Instead, you’ll need to know where you’re going and get there as smoothly as possible. So don’t just think about the chord you’re playing at the moment, but anticipate the next chord as well.
Be sure to start slow. Give your hands time to build up the muscle memory for the shapes and transitions between them. Practice with your eyes closed, or in the dark. That way you’ll learn to rely more on how the chords feel and sound rather than how they look.
Ideally, you’ll get to a point where if someone mentions the E major chord your fingers automatically crook into the shape, even without the guitar!
Start with these three basic chords, and once you’ve mastered them, start expanding your repertoire. At first, it helps to have the guitar chord diagrams as a point of reference. However, as you build up your playing skills and knowledge, you’ll know how to produce different chords without even having to think.