How To Guides
So you’ve been learning some chords, and you’re really starting to get a handle on this whole “playing guitar” thing. Congratulations — you’ve already progressed farther than many people ever will.
It’s time to take things to the next level. If you really want to advance your playing, then it may be time to take on learning about barre chords. However, just the mention of barre chords has struck fear in the hearts of many (if not most) guitarists. But don’t worry — we’re here to help you break through to the other side.
Let’s take a look at how to play barre chords and how they work to enhance your playing.
Table of contents
What are barre chords on guitar?
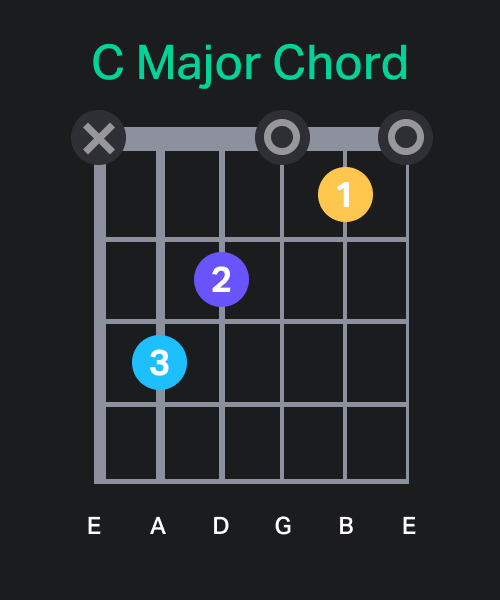
If you take a look at any basic “cowboy” chord, you’ll notice that each finger of your fretting hand holds down only one string at a time. For example, here’s an open C chord:
Barre chord shapes (or “bar chords” for short) are different from simple open chords in that one of your fingers is used to hold down, or “barre,” multiple strings at the same time. This is done by laying the right finger (based on the particular shape you’re working with) across the neck.
Much like playing with a guitar capo, your index finger is used to press down all strings across the entire guitar fretboard. Therefore, no string is left to play openly.
That’s the basic gist of things, but let’s expand on that more to explain how things work in practice.
C major barre chord
Take a look at the two charts below – they show the two most common fingerings for barre chords. Here you can see how to play the C chord using two different barre shapes:

In the first example, your first finger is used to fret the notes on the low E, the B, and the high E string. In essence, you’re using the same chord shape as with the basic F major chord. However, this time, you’re playing it on the eight fret.
Taking a look at the second chart, it’s a bit of a double whammy — not only are you using your first finger to fret the A and high E strings, but your third finger is used to fret all of the notes on the D, G, and B strings. If that seems too much of a stretch, you can instead use the middle, ring, and pinky fingers of your fretting hand to play the D, G, and B strings on the fifth fret.
D major barre chord
All of that is fine and dandy, but there’s something else that’s really cool about barre chords over simple cowboy chords — and it’s a primary reason why knowing how to play them is so helpful to your advancement as a player. Since you aren’t playing any open strings, you can move the same fingering positions up and down the neck to play different chords. What do we mean by that? Take a look at these two barre chord shapes for a major D chord:

Do you notice anything similar to the C barre chord shapes we looked at? The two shapes are exactly the same. This means that you literally can play any major chord in any key using these two barre chord fingerings. And that’s a really big deal. Why?
First off, you don’t need to learn completely different fingering patterns like you do with cowboy chords. Secondly, there are many major chords that you just can’t play with any type of open chord fingering. Examples of such chords are Bb, Eb, F, and Ab. But you can play them with these barre chord patterns.
Mastering bar chords
Barre chords can be tough to play at first. As with everything tough, practice makes progress. Not only that, but we have some tips for you that will make learning barre chords much easier and faster. Maybe you can even avoid some of the pain in your fingers that comes with learning barre chords.
Position your thumb
Before you tackle any barre chords, it’s important to understand how your hand needs to grip the neck. Playing barre chords is a little different than when you’re playing most basic chords or single note lines. Typically, the best way is to place your thumb a little lower on the back of the guitar neck, as this will help to give you the leverage needed to barre properly.
Take it one finger and one note at a time
When you’re first learning these patterns, it helps to take your time to make sure your fingers are positioned on the neck properly. Just as with fretting single strings, your barre finger (most likely the index finger) should be slightly behind the frets instead of right on top of them. Once you have your fingers placed, play each individual note to make sure that it’s ringing out full and clear. If the other fingers of your fretting hand are a bit off, they can accidentally stop the strings from ringing, basically muting them.
How do I position my index finger for barre chords?
Using the index finger of your fretting hand is most likely the biggest challenge you’ll face when forming barre chord shapes. As mentioned, the finger should be just slightly above the fret. Even still, you may struggle to get the strings to ring out cleanly. To ensure that all strings are pressed against the fretboard with your index finger, use the harder side of the finger rather than the softer part on the side of your palm. One way to do this is by pressing down your index finger and then “rolling over” so that the bony side of the finger presses the strings down.
Under pressure
A mistake many beginners make when learning barre chords is not using the correct finger pressure. Using too much can lead to notes actually sounding sharp due to the extra tension. You’ll introduce a lot of unnecessary fatigue into your hands and forearm as well.
On the flip side, too little pressure will mute the strings to where they won’t ring out at all. Once you get the hang of things, this can be used as a technique to add some flair to your playing. However, at this point, you should concentrate on using the right amount of pressure every time you play.
Getting shifty
An exercise that’ll really help you when learning how to play barre chords is to shift between different positions. Try using one finger pattern and moving to different spots on the neck. Taking that to a different level altogether is to practice changing positions and fingering patterns at the same time. For example, you could play a C major chord on the 3rd fret of the A string, shift to playing a F major chord with the root on the 1st fret of the low E string, then slide up to end on a G major chord with the root on the 3rd fret of the low E.
Check your strings
Playing guitar barre chords can be more difficult if your strings are thicker than usual. Guitar strings with a smaller gauge are thinner and will therefore require more force to press down with your index finger. The action of your guitar can also make it more difficult to press the strings against the guitar neck. The action of a guitar refers to the distance between the strings and the fretboard. Lower action makes applying enough pressure on the strings easier. This is something you can have checked at your local guitar store or do yourself if you’re familiar enough with your instrument.
What about minor chords?
When the root of the chord is on the sixth string (low E), changing from a major barre chord to a minor chord is simple. For instance, when playing the F major barre chord, all you have to do to transition to an F minor chord is lift the finger holding down the second fret of the G string (i.e., your middle finger). The same applies when transitioning from A to Am, C to Cm D to Dm, and so forth when playing barre chords.
Patience is key
Make no mistake about it — barre chords can be difficult to learn. The key is to not let yourself get frustrated. When you’re having a hard time, take a break from it for a while. There are some things on guitar that you just won’t be able to do unless you know how to play bar chords — there really is no way to avoid it. Keep that end goal in mind, and remember: “No pain, no gain.”
Make learning barre chords fun
Sometimes just dealing with the technical stuff (especially with things like barre chords that can be challenging at first) can be flat-out boring. Our suggestion? Make your practice fun. Why not take a song that you’ve learned with open chords and learn how to play it with barre chords instead? It’s a great way to learn a new technique and keep things interesting at the same time. By using barre chord shapes to play familiar songs, you’ll find yourself using much more of the guitar fretboard as you play chords higher up rather than limiting yourself to just the three or four frets on top.
Tying it all up and “raising the barre”
Barre chords can be a serious hurdle for beginner guitarists. But if you put in the effort, you’ll find yourself able to tackle all sorts of new songs and playing styles. Take the time to really practice them well, and you’ll be able to play bar chords like a pro in no time. Once you have bar chords nailed down, you’ll open your playing up to a whole new world.
To sum things up, here are a few points to keep in mind when learning how to play barre chords:
- Make sure that you place your index finger properly over all the correct strings. Don’t press directly on top of the fret but just a bit above it.
- Try angling your index finger to make sure that all strings are pressed firmly (but not too hard) against the guitar fretboard.
- When forming the barre chord shapes, place your thumb a bit lower on the back of the neck as you usually would with regular cowboy chords.
- Apply the right amount of pressure on the string — too much and the notes will sound too sharp, too little and the strings will be muted. Applying too much pressure on the strings can also leave your fingers and wrist strained.
- Play the strings after fingering the correct barre chord shape and make sure that all strings ring out as they should. Adjust your fingering if you hear that the chord sounds a bit off (for example, if some strings are muted).
- To play different barre chords, you can keep the same chord shape and just move up and down the guitar fretboard.
To make learning how to play the guitar more fun and motivating, download Yousician. You can try Yousician for free for seven days and get access to the extensive library of real songs to learn and motivating lessons to improve your skills.